
Custom Casino-Style Craps Table Build
- Timothy Goebel
- Jan 21
- 27 min read
Updated: Jan 26
How to Build a Casino-Style Craps Table (What I Learned the Hard Way)

Building a real, full-size craps table is one of those projects that sounds straightforward — until you actually start planning it. Dimensions stack on dimensions. Small geometry decisions ripple through the entire build. One early choice can quietly lock you into problems you won’t discover until much later.
This article documents my process of building a casino-style craps table from scratch, with a focus on the decisions that matter most if you’re considering building your own. Instead of a generic checklist, you’ll see what worked, what almost didn’t, and what I would absolutely do differently next time.
If you’re researching how to build a craps table, this page is meant to help you think through the project before you commit to materials, dimensions, or cuts. You’ll find practical insight on layout geometry, base construction, wall framing, felt sizing, armrests, and sourcing specialized components — the kinds of details that rarely show up in simplified guides but determine whether the finished table feels “right.”
Read this as a builder’s field notes: a way to shortcut your learning curve, avoid common mistakes, and start your own build with better information than I had on day one.
Major Materials List
Building a full-size, casino-style craps table is not cheap. The materials listed below total roughly $1,000 and reflect market pricing at the time of the build. This estimate includes core materials, finishes, and gameplay accessories, but does not include tools, labor, or mistakes along the way.
Some components in this build were sourced through CasinoSupply.com, who partnered with me on the project and provided custom materials, including the printed craps layout. If you choose to source parts through them, readers can use code TIMBER10 to receive 10% off their order.
The list below is not meant to be exhaustive, but instead highlights the major materials someone would need to intentionally source rather than already have in a typical woodworking shop.
Craps Felt / Layout – Custom-sized 8' layout used for the playing surface ($160)
Chip Rails (Pre-Made Option) – Optional alternative for anyone choosing to buy instead of routing their own (varies, approx. $15 per straight section, $30 per corner)
Cove Router Bit – Used to cut the grooves when making chip rails ($16 Amazon)
Armrest Foam – High-density foam used to form the armrest profile ($125)
Armrest / Underlayment Vinyl – Used under the felt and over the armrest foam ($64)
Diamond Rubber Bumpers – Installed on ends for proper casino-style play ($110 total)
Screw Caps – Metal caps used on exterior fasteners ($15.99 Amazon)
¾" Birch Plywood – Used for the base/drink rail ($83.08)
¾" Sandeply Plywood – Used for the sub-rail under the armrest ($65.65)
½" MDF – Used as the felt layout base ($45)
¼" Birch Plywood – Used for exterior wall skins ($45)
Ash Lumber – Used for chip rails and the stickman rail (~$100)
Faux Leather Material – Diamond-pattern material for interior walls ($49.21 Amazon)
Edge Banding – Used to finish exposed plywood edges on drink rail ($10.99 Amazon)
Carpet Masking / Protective Film – Used to protect the felt during build ($22 Amazon)
Craps Dice Stick – Standard stick for managing dice during play ($28.97 Amazon)
Craps Dice Set with On/Off Button – Dice and puck for gameplay ($16.99 Amazon)
Affiliate Disclosure: Some links on this page may be affiliate links, which means I may earn a commission at no additional cost to you if you choose to make a purchase through them.
Goals & Constraints
Before cutting anything, I had three non-negotiables:
The table needed to play correctly, not just look good
It needed to feel substantial and solid, even if that hurt portability
The design needed to stay flexible enough to correct mistakes mid-build
Those constraints drove almost every decision that followed.
Craps Table Base vs. Layout Board: A Decision I’d Reconsider
Every major decision in this build traces back to geometry, so it’s worth slowing down here and clearly defining the two foundational layers before anything else stacks on top of them.
At the very bottom of the table is what I’ll refer to as the base. This is the full-size ¾” plywood platform that establishes the outer footprint of the table. Everything eventually ties back to this piece — the layout board, the frame, the walls, and everything above.
Sitting on top of the base is the layout board. This is the panel that holds the felt and defines the actual playing surface. It is intentionally smaller than the base on all sides, creating a perimeter zone around the table. That perimeter ultimately becomes the drink rail — the area where players rest drinks, chips, or personal items while playing.
At this stage of the build, nothing exists above that zone yet.
Why the Layout Board Was Smaller Than the Base
The layout board being inset from the edges of the base was not an aesthetic choice — it was a functional one.
That setback creates a consistent perimeter around the playing surface. Later, that space becomes critical real estate when adding the wall frame and adding the outer and inner wall skins. The larger I went with the playing surface, the lesser real estate I'd have for the drink rail.
By defining this spacing early, everything above it could stack cleanly and predictably.
Corner Radius: A Subtle Decision With Long-Term Impact
One of the most important geometry decisions in the entire build was the corner radius, and I used different radii for the base and the layout board.
The base uses a larger 9" corner radius, while the layout board uses a tighter 6"one.
On paper, this difference might seem unnecessary. In practice, it did two important things. First, it made the playing surface feel tighter and more intentional. Second, it left flexibility in the surrounding perimeter for walls and drink rail.


Rather than free-handing these curves, I made physical radius templates for both the base and the layout board.
Those templates ensured all four corners were consistent and eliminated small variations that would have compounded as layers were added on top.
In hindsight, this is one of the major decisions I would reconsider in a future build.
Using a separate layout board added material, complexity, and weight to an already very heavy table.
With the benefit of experience, I now think the felt could have been applied directly to the base without meaningfully sacrificing playability or aesthetics.
Doing so would have:
Reduced overall weight
Eliminated an entire layer from the build
Simplified later transitions at the walls and sub-rail
At the time, the separate layout board felt like the “right” way to do it — cleaner, more modular, more precise. And it did work. But it also locked in a stacking order that every later decision had to accommodate.
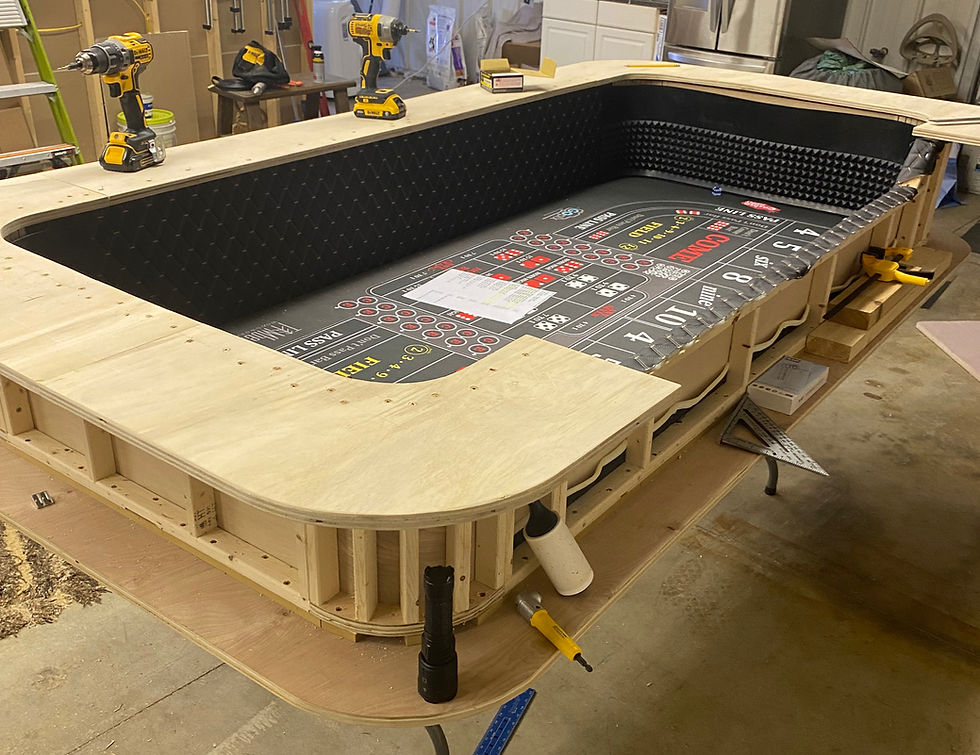
Felt First: Establishing the Playing Surface of the Craps Table

Before the walls were framed up, I focused on the felt and layout board. These two components define the footprint of the table long before any vertical structure exists.
In a craps table build, the playing surface is the reference point everything else works around. That doesn’t mean a mistake here ruins the build. There is some room to adjust later, but getting this step dialed in early makes everything downstream cleaner and more predictable.
The MDF layout board is the panel that carries the felt and defines the actual playing surface. It sits on top of the base and is intentionally smaller on all sides, creating the perimeter zone that later becomes the drink rail. That perimeter ends up doing a lot of work, so establishing it early helped frame the rest of the build.
I had to ensure that enough room was left over after the walls went up for someone to place personal items or a drink.

Between the felt and the MDF layout board, I added a layer of vinyl as an underlayment. This is a detail that is easy to overlook, but it makes a noticeable difference in how the table plays.
The vinyl adds a small amount of “give” between the felt and the rigid MDF underneath. That helps soften dice impact and improves the bounce to feel much closer to a casino table. Skipping this step is completely acceptable, but the tradeoffs are clear. Without the underlayment, the playing surface is more rigid and the dice bounce feels harder and less forgiving.
Over time, the felt will also wear more quickly as the dice edges and corners impact directly against the MDF. The vinyl acts as a sacrificial buffer and helps extend the life of the felt.

For the felt itself, I partnered with CasinoSupply.com, who custom printed an 8-foot craps layout for this table. The layout includes both my branding and theirs, which I thought was a nice way to document the project and give credit where it’s due.
If you’re sourcing felt for your own build, CasinoSupply can custom size layouts like this, and readers can use code TIMBER10 to save 10% on anything purchased from their site.
The felt was wrapped around the vinyl and MDF layout board and stapled securely to the underside. I did not use any glue to mount the felt to the MDF surface. I was concerned that dried glue could alter the playing surface, so tension and staples did the work here.
The key to stapling is starting in the middle and working outward. I placed a few staples at the top center of the board, then moved to the bottom center and stapled in the same direction while holding the felt taut. I repeated this process, alternating top and bottom, and gradually worked my way toward the corners.
Once one long side was complete, I repeated the same approach on the opposite side. This method prevents wrinkles from forming and getting locked in by the staples.

Doing this off the table made it much easier to stretch the felt evenly, align the layout cleanly, and keep the surface smooth without fighting surrounding structures. Once stapled, the layout board became a single, self-contained unit that could be positioned precisely on the base.
One thing worth calling out here is that this is a step I would rethink if I were building another table of this size.
Using a separate layout board added unnecessary weight. Structurally it worked and gave me flexibility early on, but in hindsight I would strongly consider adhering the felt directly to the base instead.
I could have stretched the felt over the base, trimmed it to the centerline of where the frame would eventually mount, and stapled it in place. The frame and walls would have hidden the trimmed edge. That approach would simplify the build and reduce overall weight without sacrificing playability.
At the time, though, the layout board made sense. It allowed me to work cleanly, make adjustments during planning, and lock in proportions before committing to permanent structures.
Once the felted layout board was positioned and squared on the base, it stayed put. From that point forward, wall placement, rail geometry, chip rail spacing, and armrest proportions all referenced this surface.
Framing the Walls: Defining the Shape of the Table

With the felted layout board positioned and locked in, the next step was framing the walls.
This is where the table starts to gain height and structure, but at this stage the focus is purely structural. Nothing here is curved, padded, or finished. This step is about creating a rigid framework that everything else will build on.
The wall frame was built from 1x2 lumber. Rather than placing the bottom plate completely outside the layout board, I intentionally overlapped the layout board by 3/4 inch. This decision served three purposes.
It physically locked the layout board in place so it could not shift independently of the base.
It allowed the wall frame to be secured directly to the base while still capturing the layout board.
It reclaimed valuable space for the drink rail. At this point in the design, every inch mattered. Overlapping the frame bought me an additional 3/4 inch of usable drink rail width that I would not have had otherwise.
Because the layout board is 1/2 inch thick, this overlap naturally created a 1/2 inch gap between the base and the remaining portion of the bottom plate. I filled that gap with scrap spacer pieces of 1/2" MDF and another 1/8" plywood to account for the thickness added from the vinyl underlayment and the felt.

These spacers were installed all the way around the layout board and screwed directly into the base. Once installed, the layout board was fully captured, supported, and tied into the structure of the table.

Wall height was another dimension I did not want to guess at. To determine it, I measured from the surface the table would eventually sit on up to a height that felt comfortable to lean against. From there, I accounted for the thickness of the sub-rail and the foam armrest that would be added later.
Working backward from a real-world comfort measurement led me to use 10-inch studs for the walls. Once the top and bottom plates were factored in, this height ended up being the sweet spot for both comfort and proportions.

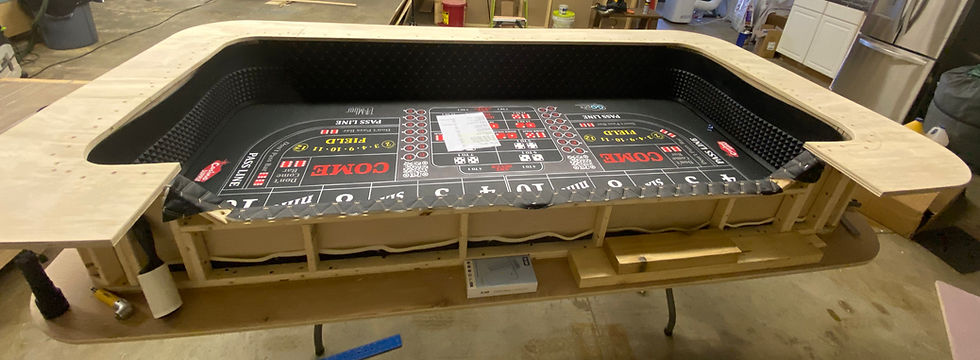
The two short end walls went up first, followed by the long side walls. The stickman side, however, required a different approach. While the studs on either side of the stickman area remained the full 10 inches, the studs in the dipped section were shortened to 6 inches to create the lowered profile.
To transition cleanly between the taller sections and the dipped center, I added two angled pieces cut at 45 degrees. These pieces connected the tall studs to the shorter ones and served an important structural purpose. They tied the geometry together and provided a solid surface later for mounting the finished stickman rail.

The corners were framed using 3/4 inch plywood for both the top and bottom plates. I used SketchUp to define the curved shape of these plates and imported those profiles into xTool Creative Space to cut a thin plywood template. That template allowed me to trace repeatable corner plates onto 3/4 inch plywood. I needed eight total pieces, two for each corner.

For anyone without access to SketchUp or a laser cutter, there is a much lower-tech way to accomplish the same thing. Sliding a piece of paper underneath the short wall and long wall frames and tracing the transition shape works surprisingly well. That paper template can then be transferred to plywood and cut out. Once one clean piece is made, it can be used as a template to trace the remaining pieces.
Once the curved top and bottom plates were cut, studs were attached along the curve and the corner assemblies were screwed into the adjoining side wall studs.
Prior to this step, the walls had noticeable flex and felt wobbly. Once the corners were tied in, the difference was immediate. The entire frame stiffened up significantly, and at that point I was confident it would hold up to people leaning against the armrest during play.

The walls would gain even more rigidity once skinned with plywood, but this was the step where the frame stopped feeling like individual wall sections and started behaving like a single, solid structure.
This was about getting the bones right. Everything that follows depends on it.
Skinning the Inner Walls: From Structure to Shape

With the wall frame fully assembled and stiffened by the corner framing, the next step was skinning the walls with 1/2" plywood. This is where the table finally begins to take on its final shape.
The two short end walls and the long side walls were skinned before touching the corners.
I considered using 1/4 inch plywood here, but ultimately chose the thicker material for a few reasons. I wanted a solid surface for dice to rebound off of, and I also wanted something substantial for the faux leather and diamond rubber bumpers to mount to later. The added thickness gave me confidence that this surface would hold up over time without flexing or feeling hollow.

Once the straight sections were completed, I moved on to the corners. Rather than trying to calculate the length of the curved skins precisely, I used a much simpler approach. I ran a piece of string along the framed corner to trace the true arc length, then transferred that measurement onto plywood that had already been cut to height. This gave me an accurate length without relying on math or guesswork.
For each corner section, I intentionally left the piece long. The goal was to guarantee full coverage rather than hit a perfect length on the first try. Kerf cuts were added along the entire length of each corner piece to allow the plywood to bend smoothly around the curve.
Once the piece was test-fit against the frame, the excess material was marked and trimmed before permanent installation.
The corner skins were then screwed into the frame, tying the straight wall sections together and further stiffening the structure. At this point, the table lost its boxy appearance and started to resemble a true casino-style form.
Wrapping the Interior Walls: Faux Leather as a Design Element
While skinning the interior walls, I realized this was the ideal moment to add the wall covering. Waiting until later would have meant fighting finished surfaces and tight clearances. Doing it at this stage gave me full access to wrap, stretch, and secure the material cleanly.

Rather than leaving the interior walls exposed wood, I wanted something that felt more intentional and closer to what you’d expect to see on a casino table. I ended up using a diamond-pattern automotive headliner material that adds visual depth without being loud, and the diamond stitching ties in naturally with the casino aesthetic with several pattern options for under $50.
This particular material struck a good balance between appearance and practicality. It is flexible enough to wrap cleanly around curves and edges, but still substantial enough to hold tension without sagging. I thought it was a simple way to elevate the look of the table without introducing a complicated upholstery process.

By installing the headliner material at this stage, I could wrap it tight around the bottom edge of the plywood wall and continue it up and over the entire top of the wall frame. That created a continuous surface with no exposed seams at the bottom and no need to tuck material into finished areas later. I did this on both long sides of the table. The photo here shows the process on the non-stickman side.
This sequence turned out to be one of those small decisions that paid off disproportionately in the final result. The material sits flat, the edges are clean, and the interior walls no longer feel like an afterthought. If this step were done later in the build, achieving the same level of finish would have been much more difficult.
Once the faux leather was installed, the interior wall surfaces were essentially finished. From there, I could continue shaping and building the rest of the table without worrying about access or damaging a completed surface.
Installing the Sub-Rail: The Foundation for Everything Above
Before chip rails or armrests could be added, the sub-rail had to be installed. This component doesn’t get much attention visually, but it does most of the heavy lifting. It supports the chip rails, carries the armrest, and takes the constant load of people leaning into the table during play.
For those reasons, the sub-rail was built from 3/4 inch plywood and installed in sections around the perimeter of the table. Using 3/4 inch material here was intentional. This is the layer that ultimately carries body weight, and I did not want any flex once the armrest was installed.
Because of the size of the table, the sub-rail could not be cut from a single sheet of plywood. The sections were laid out to minimize waste while still maintaining consistent width and strength around the perimeter. Each section was dry-fit first, then permanently fastened with screws directly into the frame once I was confident in the fit.

With a smaller table, say a 6 foot layout, you may be able to get away with cutting the sub rail as one solid piece, but for this size of table, my dimensions exceeded the 4'x8' sheet of plywood.
At the corners, the sub-rail followed the same general geometry as the wall frame, but this is where theory met reality. On paper, the corner radius made sense. In practice, once foam and vinyl were introduced later, those corners ended up being too sharp. That issue wasn’t obvious at this stage, but it would become very apparent during the armrest installation.
Once installed, the sub-rail created a continuous, level platform around the entire table. From here on out, chip rail placement, armrest shaping, and final fitment could all reference this surface.
With the sub-rail in place, the table was finally ready for one of the biggest decisions in the entire build.
Chip Rails: A Fork in the Road
The chip rails were one of the biggest fork-in-the-road decisions in this build. You can either buy pre-made casino chip rails, or you can make your own. Those two paths are very different.
There’s no right answer here. The better choice depends on your tools, your tolerance for trial and error, and what you personally want to say about the finished table.
Buying Pre-Made Chip Rails
Buying pre-made chip rails is the faster and more predictable option. Pre-made rails come with consistent groove depth, clean edges, and purpose-built corner pieces that align correctly without guesswork. If you want curved corners, this option saves a significant amount of time and complexity.
Pre-made rails also eliminate one of the most error-prone parts of the build. Routing long grooves accurately, repeatedly, and safely is not trivial. If your goal is to get to a finished table quickly or you simply don’t enjoy this kind of milling work, buying rails makes a lot of sense.
The downside is cost, and to some degree, ownership of the process. The straight sections are about $1 an inch. The corners run about $30 each. Purchasing rails also means accepting someone else’s profile, dimensions, and corner geometry. For many people, that tradeoff is absolutely worth it.
Making My Own Chip Rails
I chose to make my own chip rails.

Part of that decision was cost, but a larger part of it was personal. I wanted to be able to say I built this table, start to finish. Buying pre-made wooden components would have taken away from that for me, even if it made the build easier.
The rails were milled using a cove router bit (Amazon) on a router table. Before any pieces were cut to final length, I dimensioned all of the lumber and ran each board through the router at the same bit height. One pass per board, then the bit was raised slightly and the process repeated. I used a poker chip to gauge the proper depth of the grooves. Whatever happened to one board happened to all of them, which kept everything uniform.
This approach also proved to be the right move from a safety and error-recovery standpoint. A few boards experienced kickback or tear-out during the routing process. This was likely because I attempted to remove too much material in one pass. However, since the boards were still long at that stage, I could simply cut around the damaged sections later.

If everything had already been cut to length, several pieces would have been unusable.
The cove bit wasn’t an exact match for the size of a casino chip, so after establishing depth, the router fence was adjusted incrementally to widen the groove. A scrap board with identical dimensions was used to dial this in before touching the actual rails. Once the fit was right, the whole process was repeated for the second groove, since each rail holds two rows of chips.
This was time-consuming work. There’s no way around that. A pair of noise-cancelling Bluetooth headphones and a good podcast kept my sanity in tact.
After routing, the grooves were sanded using a cylindrical foam sanding block wrapped in sandpaper. This helped maintain a consistent curve to remove the burn marks inside the groove without flattening edges.
I have gotten in the habit of keeping any foam packing material that comes in unique shapes to use as sanding blocks. It’s one of those oddball shop solutions that ends up being perfect for a very specific task.

At the corners, I opted not to attempt curved chip rails. Building jigs to route curved rails accurately was more complexity than I wanted to introduce. Instead, I used 45-degree segments at the corners. This was a conscious compromise. It simplified fabrication while still maintaining a clean, intentional look.

The Tradeoff
Making the rails yourself saves money and gives you complete control over the final look, but it costs time and attention. Buying rails costs more, but eliminates risk and speeds up the build significantly, especially if you want curved corners.
I don’t regret making my own rails, but I also wouldn’t discourage anyone from buying them. This is exactly the kind of decision that’s worth understanding before you commit, rather than discovering halfway through that you’ve taken on more work than you expected.
At this point in the build, both paths reconverge. Regardless of whether the rails are built or bought, they still need to be sanded, fit, stained, and permanently installed. That’s where the real precision work begins.
Dry Fitment, Protection, and Prep Before Final Install
Regardless of whether the chip rails were purchased or built from scratch, everything reconverges at this stage. Before any stain or permanent attachment, the rails need to be dry-fit, stained and top-coated. This step has a big impact on how the finished table looks.
I started by laying 12" chip rail sections in place around the table without any glue. This included the straight runs, corner pieces, and the spacer blocks that separate rail sections. Rather than working randomly, I began at the corners and worked inward. Starting from each end and moving toward the middle helped maintain a uniform look along the long side of the table.
Where the two ends converged at the center, I ended up with one shorter rail section. That piece was obviously smaller, but it didn’t look sloppy-something I was worried about. If I had started at one end and worked all the way across, the final short section would have made it clear that the layout hadn’t been thought through. By centering that smaller piece, the overall look stayed intentional and balanced.

The same approach was used on the short sides, which also resulted in one shorter section centered between uniform pieces.
Once I was happy with the layout, I locked it in visually before touching stain. Each chip rail section was numbered on the underside, and the corresponding location was marked on the top of the sub-rail. With so many similar-looking pieces, this step made reassembly after staining straightforward and eliminated any guesswork.
Before staining anything, I took steps to protect the felt. I taped along the entire perimeter of the playing surface and covered the layout completely using carpet masking film (Amazon). This masking film had a light adhesive backing that held it in place without leaving residue once removed. It worked extremely well and gave me peace of mind while staining, sanding, and handling finished wood around the table.
In hindsight, this is something I should have done much earlier in the build. Protecting the felt from the beginning would have prevented debris and incidental contact throughout the project. It’s a simple step that’s easy to overlook, but it makes the rest of the build far less stressful.

With the felt protected and every chip rail section accounted for, I could move on to staining and finishing with confidence. At this point, the focus shifted from fitting and planning to final appearance and permanent installation.
Staining, Finishing, and Permanent Installation of the Chip Rails
With the chip rails dry-fit, numbered, and the felt fully protected, I moved on to staining and finishing. This is the stage where the rails finally stop feeling like shop parts and start looking like furniture.
In hindsight, I would change the order slightly. I glued the spacer blocks to the chip rail sections before staining, and while it didn’t cause any major issues, it did make the process more tedious than it needed to be.
Staining first and gluing the spacers afterward would have made it easier to work stain evenly into the chip grooves near the spacer ends. It’s a small thing, but worth noting if I were to do this again.

Each chip rail piece was stained individually, taking care to work stain into the grooves and wipe back consistently so the color stayed even from piece to piece. Once the stain fully dried, I applied polyurethane to protect the finish. These rails see constant contact from chips, hands, and occasional drinks, so skipping a protective topcoat wasn’t an option.
After the finish cured, I brought the rails back to the table and began permanent installation. Because I didn’t want any visible fasteners in the chip rail, everything was attached with glue only.
Using the numbering system from the dry-fit stage, each piece went back to its exact location. I applied glue generously to the underside of the rail sections, positioned them carefully on the sub-rail, and clamped them in place using scrap boards to distribute pressure evenly. I worked in small groups, typically five or six pieces at a time.

This was not a fast process. Once a section was clamped, I left it alone until the glue had fully cured before moving on to the next group. Sometimes that meant waiting a few hours, other times it meant coming back the next day. Rushing this step would have risked shifting pieces that were already aligned correctly, undoing a lot of careful prep work.

By the time the last section was glued down, the chip rail finally felt permanent. The rails were solid, aligned, and finished in a way that matched the rest of the table. It took several days to complete this stage, but spreading the work out ensured nothing moved before it was ready.
With the chip rails fully installed, the top of the table was essentially locked in. From here, the focus could shift outward to the stickman rail, exterior skins, edge banding on the drink rail, and final finishing work.

The Stickman Rail: Completing the Dealer Side
Once the chip rails were fully glued and cured, the next step was finishing the stickman side of the table. This side is fundamentally different from the player-facing sides. There is no chip rail here, but it still needs a finished surface that feels intentional and holds up to constant use.
The stickman rail was made from the same wood species as the chip rails so it visually tied into the rest of the table. Rather than adding contrast, I wanted this area to blend in and feel like a natural continuation of the rail system.

The main horizontal stickman rail was mounted directly to the frame using screws. The screws were plugged using wood plugs cut from the same species, which allowed the rail to disappear visually once finished.
To transition from the lower stickman rail up to the higher chip rails on either side, I added angled transition pieces cut at 45 degrees. These pieces taper from the full depth of the chip rail down to the thickness of the stickman rail. Functionally, they bridge the height difference. Visually, they make the transition feel deliberate instead of abrupt.
These transition pieces were installed first so their geometry could be locked in before the main stickman rail went on permanently. Once everything aligned cleanly, the stickman rail was fixed in place.

At this point, the entire top edge of the table was structurally complete. The chip rails were solid and the dealer side was finished.
From here, the remaining work shifted back to the exterior of the table and then into upholstery.
Skinning the Exterior Walls and Preparing for the Armrest
Before moving on to the armrest, I wanted to get all of the staining and finishing work done that would be difficult or messy once upholstery was involved. That meant addressing the drink rail edge first, then skinning the exterior walls while everything was still accessible.
I started by applying edge banding (Amazon) along the exposed plywood edges of the drink rail. This cleaned up the perimeter and gave the rail a finished profile before any stain was applied. It’s a small detail, but skipping it would have left the rail looking unfinished and unprofessional.

With the edge banding in place, I moved on to skinning the exterior walls. I used 1/4 inch plywood for the exterior skins and screwed it directly into the wall frame. The thinner material worked well here. It was easy to handle, conformed cleanly to the structure, and didn’t add unnecessary weight to the table.

As with the interior walls, the corners required kerf cuts so the plywood could bend smoothly around the curved sections. I intentionally left the corner pieces long during fitting to ensure full coverage, then trimmed them to final length once the curve was established. This made it easier to get clean transitions without gaps or forced bends.

Once the exterior skins were installed, all of the remaining exterior wood surfaces that needed stain were ready.

I stained the drink rail, stickman rail and exterior walls together so the color stayed consistent across the entire table. After the stain dried, a protective finish was applied to seal everything before moving on to the armrest.

Before moving on, there was one more detail to clean up on the exterior walls.
Where the exterior wall skins met, the seams were still visible. Rather than leaving those exposed, I covered them with narrow trim strips cut from the same wood species. These pieces were intentionally kept slim so they read as a design detail instead of a structural element.
The trim was stained at the same time as the exterior skins so everything blended together visually. Once installed, the seams essentially disappeared, and the exterior walls felt much more intentional and finished.
The trim was attached using a brad nailer, which made quick work of the install without splitting the thin pieces. This step didn’t add much time, but it made a noticeable difference in the final appearance of the table.

At this point, all exterior wood surfaces were skinned, trimmed, stained, and sealed. With that work complete, the build could finally move into the upholstery phase without worrying about finishing around foam and vinyl.
Armrest Construction and Upholstery
With all staining and exterior finishing complete, the final major build phase was the armrest. This is the part of the table players interact with the most, so comfort and durability mattered just as much as appearance.
Both the foam and the vinyl for the armrest came from CasinoSupply.com (remember to use code TIMBER10 for 10% off). The foam arrived as a large roll, which meant it needed to be cut down into strips sized specifically for this table. That flexibility was actually a benefit, since it allowed me to dial in the armrest profile rather than work around a pre-cut shape.

To form the armrest, I cut the foam strips to twice the width of the finished armrest and folded them in half, with the folded edge facing inward toward the chip rail. This created a rounded profile once the vinyl was stretched over the top, giving the armrest a soft, comfortable shape.
The vinyl installation followed a specific sequence. I started by stapling the inside edge of the vinyl first, the portion that sits directly against the chip rail.

With that edge secured, I inserted the folded foam into place, then stretched the vinyl up and over the foam and around the outside edge of the sub-rail. From there, the vinyl was stapled to the underside of the sub-rail and the excess material was trimmed away.

Doing it in this order made the process far more controllable. The foam stayed seated properly, the vinyl stretched evenly, and the finished surface stayed smooth without bunching or wrinkles.
One thing worth calling out here is that I built the armrest in sections rather than as one continuous piece. It worked, and the final result looks good, but if I were to build another table, I would handle this differently.
In hindsight, a single, continuous piece of vinyl that wraps the entire armrest, excluding the stickman side, would have produced a cleaner, more polished look. Breaking the armrest into sections made the installation easier, but the tradeoff is visible if you know what to look for. The seams aren’t bad, but they are there. A one-piece wrap would have taken the finished table up another notch visually. It’s something I would change without hesitation on a future build.

Despite that, the armrest turned out comfortable, durable, and solid. The foam density feels right during play, the vinyl has held up well, and the armrest ties the entire table together both visually and functionally.
With the armrest installed, the table was nearly complete. Everything after this point was refinement rather than construction.
Exterior Fasteners and Screw Caps
One small detail that surprised me was how much the exterior fasteners contributed to the finished look.

Where the exterior plywood skins were attached to the frame, I initially expected exposed screws to cheapen the appearance. I considered filling and hiding them entirely, but instead decided to try metal screw caps (Amazon). I used low-profile metal caps that were simple to install.
I had to back out each screw and place a brass ring between the wall and screw. The cap easily twisted onto the ring covering the screw head.
Installation was straightforward, and the result was better than expected. Rather than looking like an afterthought, the caps ended up reading as a deliberate design element. They added subtle visual rhythm along the exterior walls and complemented the overall industrial, casino-grade feel of the table.
This is one of those cases where the simpler solution turned out to be the better one. If you are building a table like this and debating whether exposed fasteners will hurt the look, these caps are an easy upgrade that requires almost no additional effort.
Once the screw caps were installed, the table was functionally and visually complete.
Conclusion: When It Finally Became a Table
There wasn’t a single moment when this build suddenly felt finished. It happened gradually, in layers.

Each phase solved a problem, introduced a new decision, or forced a small correction. Some choices worked exactly as planned. Others needed to be revisited once theory met reality. That’s the nature of a project like this, and it’s also why documenting the process mattered as much as the final result.
What surprised me most was how much the feel of the table depended on details that are easy to overlook. The underlayment beneath the felt. The diamond bumpers on the ends. The weight and stiffness of the rails. Without those elements, the table would have looked good but played like furniture. With them, it plays like a real casino table.
Once the armrest was installed and the final exterior details were complete, all that was left was to make the table playable. Adding the dice stick, dice, and on/off puck seems minor, but that was the moment the build crossed the line from woodworking project to game-ready table. That’s when the dice finally rolled, and the table did exactly what it was built to do.
This build isn’t meant to be copied step for step. It’s meant to show what goes into a full-size, casino-style table when playability, durability, and appearance all matter. There are cheaper ways to build a craps table. There are faster ways. This wasn’t either of those.
If you’re considering a build like this, the biggest takeaway is to be honest with yourself early. Decide where buying makes sense and where building adds value. Protect the things that are hard to replace. Expect to adjust plans once materials are in your hands. And give yourself permission to slow down when precision matters.
In the end, the table does exactly what I hoped it would. It looks right. It plays right. And it holds up to real use. That made every decision, correction, and extra step along the way worth it.
If you were building your own table, what would you do differently based on your experience? Let me know in the comments!


Comments